PXE Boot – Introduction
What can you expect to learn about PXE from this post?
- High level overview of PXE boot process.
- Use cases for PXE boot.
- Detailed end to end overview of the PXE boot process.
- Technical details of each stage.
What is PXE?
In this post we are deep diving into PXE boot. PXE stands for preboot execution environment. It is standards base and can be implemented using open source software or vendor supported products. PXE is a key part of data center infrastructure because it enables automated provisioning of servers or work stations over a network. An in depth understanding of the PXE stack benefits anyone working on infrastructure deployment of bare metal servers, embedded devices and IOT devices.
Authors background
I first implemented a PXE boot environment in a production data center 15 years ago. Installing operating systems from CDROM was painfully slow and we desired an automated solution. The knowledge I gained from that project increased in value through out my career. Since then I have worked with PXE in large scale deployments provisioning thousands and thousands of hosts in data centers across the globe. I am excited to share what I have learned through years of hands on experience.
Why did I write this guide?
PXE is often seems like a dark art. Typically only a handful of people in the team truly know how the environment’s PXE infrastructure boot works. Additionally debugging it is hard, debugging remotely even harder. Therefore, I wrote this guide to help demystify PXE boot by explaining it a simple, thorough and interesting fashion.
High level overview of PXE boot
PXE Use Case, What problem does it solve?
PXE solves a problem large enterprises face. How do you automate provisioning or installation of operating systems on large quantities of machines?
Operating system such as Windows or Linux have mechanisms to automate installation. Typically you create a seed file or configuration. The seed file provides answers to the questions asked by the OS installer. In the linux world examples of this are debian preseed files or Redhat kickstart files. But still you need access to the installation media on CD/DVD-ROM or a USB drive. A human running around with the usb drive touching every server does not scale. Its time consuming and error prone. Lets imagine a world where a human puts a server in the rack, powers it on and is done. This has many benefits:
- Installers can be less technical.
- Reduced time spent per server.
- Less error prone due to automation.
- OS installation tools are centralized and easier to update.
This is where PXE comes in. PXE is a standards based approached to solving the problem of getting the OS onto the system without a human being putting media (USB, CD/DVD-ROM) in the system. It does this by bootstrapping the machine over the network.
In a fully automated environment the human installing the server does the following:
- Installs server in the rack.
- Connects power and network.
- Walks away.
The powered on server automatically fetches a network boot file (NBF) to boot itself up and provisions an operating system. It is a beautiful thing when its working properly 🙂
How does it work?
It all starts with the NIC
The start of a PXE workflow is booting network interface card (NIC). In a typical PC or laptop the NIC will not do anything until the operating system boots and loads the proper driver. However network booting requires a PXE enabled NIC. The NIC contains firmware with a tiny network stack. This firmware is capable of connecting to the network and fetching a file to boot, commonly referred to as the network boot file (NBF). The file could be a kernel or it could be network enabled boot loader.
The server boots the file downloaded off the network. Typically the boot image kicks off an automated installation of an operating system. Now lets dive into the components that make this process possible.
PXE boot components
A typical PXE environment has the following components.
PXE enabled NICs
Not all NICs are equal. Many consumer grade network cards do not have a PXE capabilities. Although that is rapidly changing as advances make it easier to include more features in cheaper devices. PXE enabled NICs are the defacto standard in data center grade servers. We suggest you double check before you buy. However I would be surprised if any major server manufacturer ships a NIC without PXE capability these days.
Some of the PXE enabled NICs even use open source PXE firmware. IPXE is an open source firmware often installed on data center NICs.
DHCP Server
DHCP stands for Dynamic Host Configuration Protocol. There are two types of actors in DHCP. The DHCP server and the DHCP client.
A DHCP server provides a network configuration to clients. Specifically, DHCP provides an IP network configuration to a client. A DHCP client runs on computers that join the network and need a configuration.
An example of real world DHCP use you are probably familiar with is connecting to your office LAN. Your laptop has no idea what IP addresses are in use on the network it has joined. The DHCP client on your laptop sends a broadcast to the network indicating it is looking for a DHCP server. A response is sent from the the server to announce its availability. Your client acknowledges this by sending a request for a DHCP lease. The DHCP server sees this request and finds an unused IP address. Your laptop gets a DHCP lease offer from the server. The lease offer among other things includes the IP address you will use. Your laptop’s DHCP client accepts the offer and begins using the IP address to talk to on the network. As lease expiration time approaches your laptop will ask to renew.
In a PXE boot environment there is always a DHCP server. The machines that are being provisioned are DHCP clients. The PXE enabled NIC has a DHCP client built into its firmware.
DHCP supports a wide range of options that can be provided to network clients. But typically it consists of an IP address for use by the client, a default gateway address and DNS servers to use for name resolution. In the case of PXE, an option that contains the IP address of the server to download its boot files from.
TFTP Server
TFTP stands for trivial file transfer protocol. It is a simple UDP based protocol for getting or sending a file. It’s simplicity lends well to being implemented in firmware environments where resources are limited. Due to its simple nature TFTP has no bells or whistles. Getting and putting files are supported, that’s it. There is no directory listing, you must know the exact path of the file you want to download. Additionally there is no authentication or authorization.
While TFTP is still commonly used in PXE environments, advances is in technology has resulted in some PXE implementations supporting more complex protocols like HTTP or ISCSI. For example the IPXE firmware supports:
- HTTP
- ISCSI Storage Area Networks (SAN)
- Fiber channel over ethernet (FCOE) Storage Area Networks (SAN)
- ATA over etherent (AOE)
Putting it all together
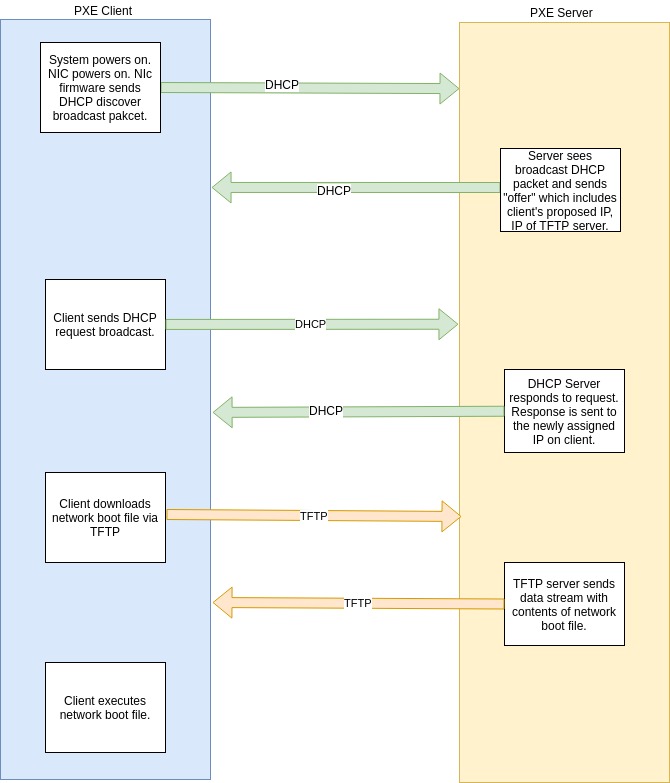
The above diagram illustrates a basic PXE workflow. Lets review each of the steps.
PXE DHCP Steps
- Client PXE enabled NIC powers on and boots firmware.
- Firmware’s DHCP client sends a broadcast packet to the local area network indicating it needs a network configuration from the DHCP server.
- The DHCP server responds with what is called an “offer”. The offer contains the network configuration as specified by the DHCP protocol specification.
- The DHCP client, happy with the result now sends a DHCP request. This request basically means “I got the offer, I want to confirm before moving forward”.
- The DHCP server then responds with a unicast packet directed at the assigned IP address. Note that up until this point all packets have been broadcast.
- The DHCP client gets the response and starts using the network configuration.
PXE TFTP Steps
At this point the NIC firmware in the PXE client has an IP configuration. Part of that configuration should have been what is referred to “next-server” option. The next-server option is a DHCP option that tells the client where it should go to download the network boot file.
- NIC firmware makes a TFTP request to the server using the IP or name specified in the next-server option of the DHCP lease.
- TFTP server sends the requested file in a udp data stream.
- NIC firmware receives the file storing it in memory.
- Server then executes the downloaded file.
Next steps after TFTP
What happens at this point will vary depending on the environment and goal of the PXE boot configuration. Some examples are OS installation or full network boot.
OS Installation Use Case
The system boots up an automated OS installer image that installs an OS to the local drive. After the installation a reboot is performed to reboot into the local OS.
Full Network Boot Use Case
In this use case the server boots entirely over the network on every boot. Typically the root file system is mounted via NFS. Pros of this configuration are the servers can run with no local storage. Cons are that the network needs to be functional to boot the server and performance may not be as good as local storage.
Variations
The PXE environment we just described is a simple and common configuration. It is a good starting point for newcomers trying to understand PXE for the first time.
Here are some variations you will see in the real world. Especially in enterprises.
- DHCP relay or “helper”. The relay forwards DHCP request to a DHCP server not on the local LAN. This functionality is common on enterprise routers.
- PXE proxy or relay. This is often used when one does not have the access required to modify the DHCP server configuration. In this case the relay responds to the DHCP request with just the server and filename of the network boot file. Letting the existing DHCP server provide the standard IP configuration.
- HTTP or HTTPS instead of TFTP for retrieval for the network boot file.
Conclusion
In conclusion PXE is a very powerful tool for automating and managing the provisioning and updates of data center infrastructure, embedded devices, IOT devices and even workstations. We have covered the basics and hope you walk away from this article with a better understanding.
Related articles on Linuxhit.com
Appendix & further reading
- PXE Specification
- TFTP protocol specification RFC 1350
- DHCP protocol specification RFC 2131
- IPXE
Feedback
We appreciate feedback. If you have ideas on how we can make this article or site better please leave a comment.
Simple and straightforward explanation of PXE boot process. Thanks for sharing this article.